Frozen Fruity Treats
- 1 (8‐ounce) container nonfat lemon yogurt
- 2 cups cubed, seedless watermelon
- 1 pint fresh strawberries, tops removed
- 1 medium banana, peeled and sliced
What To Do:
- Place yogurt and fruit in a blender. Cover tightly.
- Blend until smooth. Pour into muffin tin lined with paper cups.
- Freeze until frozen solid, at least 2‐3 hours.
- Remove from freezer, and let sit about 10 minutes. Peel paper cup off each treat and enjoy.
Tip: Add popsicle sticks or coffee stirrers to make it a little easier to eat.  Source: adapted from Cooking with EFNEP cookbook
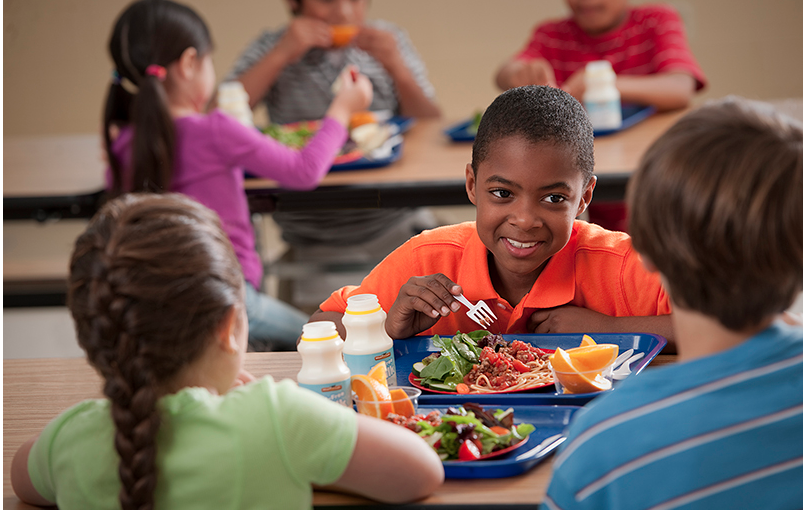
Fuel Your Way Back To School
The food we eat helps supply our brains with the energy they need to function well. During the school year, children spend roughly 35 hours per week in school where they are focusing, learning, communicating, and thinking. All of these tasks require children’s minds to be alert, and a balanced diet to supply them with quality energy helps them do so. From breakfast, lunch, and dinner to the snacks in between, you can discuss with your kids how to fuel their bodies with healthy food at home and at school.
Here are some tips to get them off to a good start this school year:
- Your kids can get their day off to an energizing start by eating breakfast. Whether they eat at home or at school, encourage them to choose whole-grains (such as oats and whole-wheat bread) and fruit for fiber, and nonfat/low-fat dairy for protein. These nutrients can help keep them full until their snack or lunchtime. Check out this link to find ideas for breakfast foods your kids will love: http://www.clemson.edu/extension/hgic/food/nutrition/nutrition/life_stages/hgic4106.html
- School lunches have made big steps towards providing children with healthier options since I was in school. Look at the cafeteria menu and talk to your kids about
 the healthier options on the menu. On those days that there are not as many choices of fruits, vegetables, and other foods low in fat, sodium, and sugar, help your children decide what they would like to bring from home for lunch.
 - Consider this: a lunch packed from home isn’t automatically healthy, because it could still include the same types of food in the cafeteria you’re trying to avoid, such as pizza, French fries, and sugary beverages. How can you ensure that the food you pack your kids is going to fuel them well? Aim for whole, minimally processed foods, including whole grains, fruits, vegetables, lean protein, and nonfat/low-fat dairy. Also, choose water to drink to keep them hydrated and focused!
- Do your children have snack breaks at school? Vending machines are still readily available for children in many schools. Talk to your kids about why vending machines foods aren’t the best choices, and brainstorm ideas of healthier alternatives that they can bring from home, such as whole grain crackers and low-fat cheese.
- Cold foods should be kept cold to avoid getting sick from eating the food. If a refrigerator is not available, choose a lunch box with insulation, and pack it with ice packs that will keep it at a safe temperature until they’re ready to enjoy the food.
- Sweets and salty snacks don’t have to be avoided altogether. I love a bowl of ice cream after a long day or a bag of chips with my lunch once in awhile. Explain to your kids that a healthy diet can include these foods, just in small servings. A healthy diet is a balanced diet!
- Including your children in these decisions is very important. If they don’t like the foods you send them to school with, who’s to say they’ll actually eat it? Set a good example for them at home and expose them to many different healthy foods to encourage them to eat well.
Eating a healthy diet won’t guarantee good grades and behavior in school, but it can promote them!
Wishing you all a nutritious and balanced start to the school year,
Cara
Cara is an EFNEP student intern.
Try a pita pocket sandwich
Sandwiches are a common staple food on a lunchbox menu for children, but I’ve noticed sandwiches have gotten a reputation as being boring or bland because children get tired of eating the same old sandwich for lunch every day. Sure, spreading some peanut butter and jelly on bread or just slapping on a few cold cuts makes for a tasty and easy meal, but eating that every day can make sandwiches less appealing. Get creative with new sandwich recipes and combinations to make lunch a meal that your child (and you) will look forward to!
Here are some tips on how to expand your sandwich selections:
- Swap the usual sandwich bread for a tortilla, open-faced flatbread, or pita pocket. Aim for a whole-wheat option for added fiber, vitamins, and minerals!
- Try adding different vegetables (or even fruits!) for variety and color.
- Have leftovers? Think about how you could put them together to create a unique sandwich.
- Avocado, in small portions, is a healthy alternative to a popular sandwich condiment: mayonnaise. Mash up an avocado and mix it with plain nonfat or low-fat yogurt to make a creamy spread for your sandwiches. Add lemon or lime juice for extra flavor!
Corner Kick Pita Pocket
Makes 2 servings Serving Size: 1/2 pita pocket

Ingredients
- ½ cup spinach, trimmed leaves
- ¼ cup cucumber, sliced
- ¼ cup carrots, shredded
- 1 tablespoon salsa
- 1 tablespoon fat-free Ranch salad dressing
- 1 (6 ½) inch pita pocket
- 4 oz. extra-lean ground beef (5% fat), cooked
- 1 cup cantaloupe, cubed
Directions
- Combine beef, spinach, cucumber, and carrots with salsa and Ranch dressing. Mix well.
- Cut pita in half. Using your finger, slowly open the pocket so as not to tear the bread.
- Divide beef and veggie mix in half and place in each pocket half.
- Serve each pocket with ½ cup cantaloupe.
Source: http://www.fruitsandveggiesmorematters.org/corner-kick-pita-pocket
Who says sandwiches are only for lunch? I’m having this for dinner tonight!
Cara
Cara is an EFNEP student intern.
Who wants watermelon?
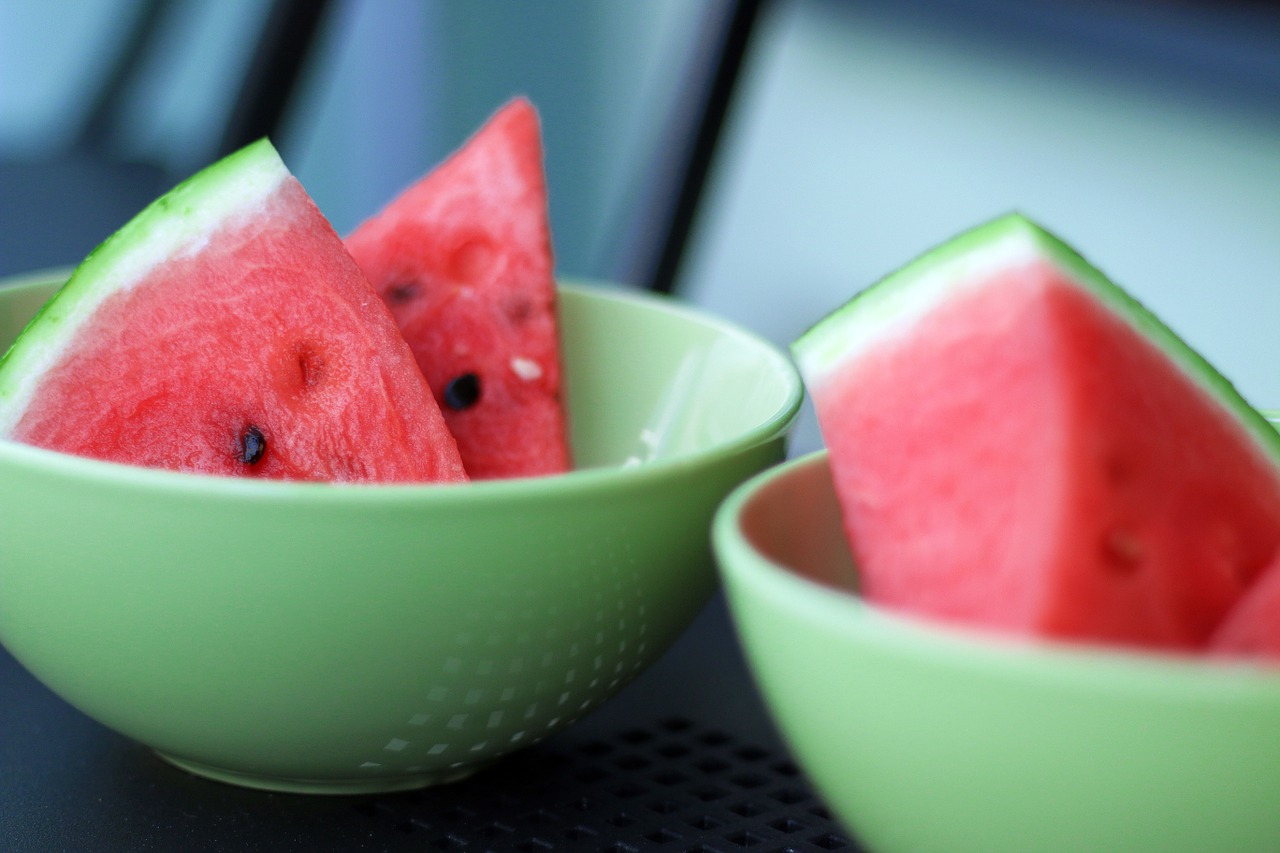
When I was growing up, watermelons were a favorite summer time fruit in our household. On a hot day, the taste of a cool slice of watermelon (with a pinch of salt) was not only refreshing, but also helped us stay hydrated. My mom, who is a lover of watermelons herself, very rarely purchased the fruit because neighbors and family friends always shared their crops with us. One summer, we decided to grow our own watermelons. We were very excited to use seeds that had been saved from the previous year. While we had good intentions, needless to say, our attempt failed miserably. It was at this point that we decided to stick with eating watermelons instead of growing them. Perhaps our gardening skills needed some work.
Here are a couple of facts about watermelons:
- Watermelons, while very tasty are also very nutritious. They are low in fat and calories and high in potassium.
- They are mostly water (about 92 percent), but have lots of nutrients. Each juicy bite has significant levels of vitamins A, B6 and C, lots of lycopene, antioxidants and amino acids.
- Watermelons also have many health benefits including: lowering the risk of heart disease, reducing inflammation, aiding in digestion, keeping skin and hair moisturized.
- For more fun facts, check here: http://www.watermelon.org/Faqs
Choosing the right watermelon can be a little tricky. You should look for one that is heavy for its size with a rind that is relatively smooth; neither overly shiny nor overly dull; without any cuts or bruises on its surface which might have occurred during transportation. Once at home, place the fruit in a cool, well-ventilated place. The cut sections should be kept inside the refrigerator.
After choosing the right watermelon, let’s prepare it for serving. First, you should wash the whole melon in cold running water or clean it with a wet cloth to remove surface dirt or any other residue. Then, it’s ready to serve. The watermelon can be cubed, scooped into balls or just eaten the old-fashioned way — sliced and right off of the rind.
Fresh watermelon should be eaten as it is, without any additions/seasonings to experience its delicious, natural sweet taste. Here are some serving tips:
- Cubes or sections of the melon are a great addition to fruit salad. Top its wedges with cold chocolate cream and relish!
- Jam, sorbet, fruit cocktail, and juice are some nutritious and delicious recipes you can make with melons.
- The seeds are roasted and eaten as a snack in some Asian countries.
- Its rind is used and eaten as a vegetable in some South American countries.
Try this easy recipe! It’s unique, but one that I believe you will enjoy.
Stephanie
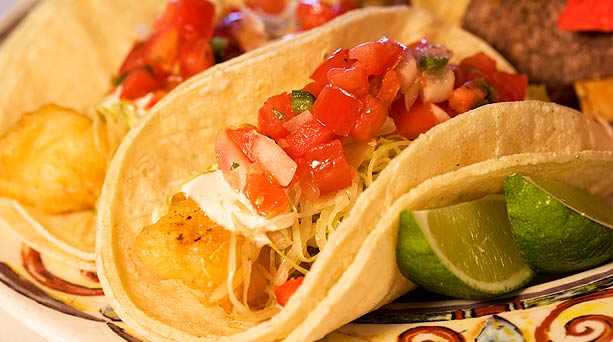
Festive Fish Taco
Makes 4 servings (Serving Size: 2 tacos)
This recipe is a 3-step recipe. First, make the salsa. Second, make the coleslaw. And third, cook the fish and assemble the tacos. The salsa and slaw can be made the day before to allow flavors to blend.
SALSA –
Ingredients:
1 mango, finely chopped
¼ cup green bell pepper, finely chopped
¼ cup cucumber, finely chopped
½ cup red onion, finely chopped
2 tablespoons cilantro, finely chopped
1 ½ teaspoons chili powder
1 tablespoon lime juice
Directions:
- Mix all ingredients together
- Set aside
SLAW MIX –
Ingredients:
2 cups cabbage, finely shredded
¼ cup fat-free Ranch dressing
1 teaspoon chili powder
Directions:
- Mix all ingredients together
- Set aside
TACOS –
Ingredients:
Salsa
Slaw mix
4 tilapia filets (or other white fish)
Non-stick cook spray
Black pepper, to taste
Paprika, to taste
8 (6-inch) soft corn tortillas
1 cup cheese, grated
Directions:
- Preheat broiler in oven. Adjust top rack to rest approximately 6 inches from broiler.
- Line pan with aluminum foil and spray with non-stick cooking spray.
- Place filets on prepared pan and sprinkle with pepper and paprika to taste.
- Broil filets until cooked, about 6 minutes or until fish flakes easily when tested with a fork.
- Meanwhile, wrap tortillas in damp paper towels and heat in microwave for 30 seconds.
- Divide each filet in half. Place half of cooked filet in each tortilla.
- Top with slaw mix and salsa.
Nutritional Information per Serving
260 Calories, Total Fat, 4.5g, Saturated Fat 1g, Protein 24g, Total Carbohydrate 29g, Dietary Fiber 2g, Sodium 110mg.
Tip: Pico de gallo can be used in place of salsa.